Capture the Magic: A Guide to Real Estate Twilight Photography
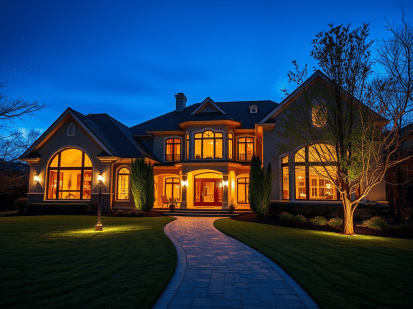
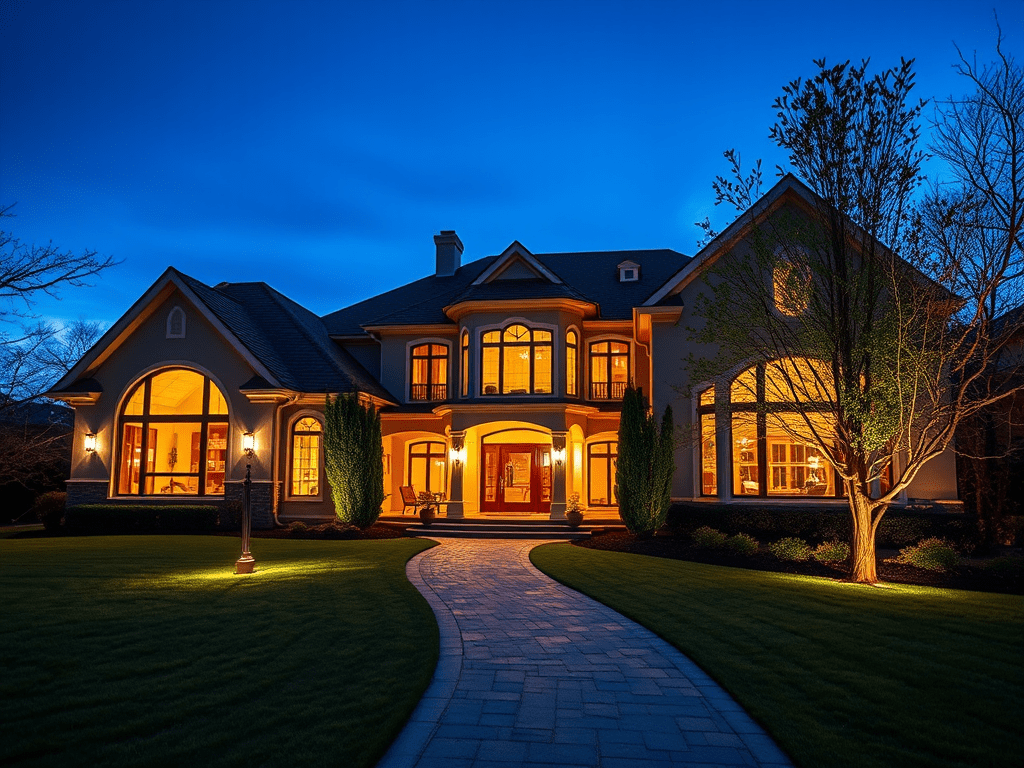
Twilight photography—that captivating moment just after the sun sets (the “blue hour”) — is arguably the most dramatic and luxurious way to showcase a property. The warm, inviting glow of the interior lights paired with the deep, cool tones of the sky creates an image that instantly grabs a potential buyer’s attention.
While it’s a short window, mastering the technique is a game-changer. Here is your step-by-step guide to capturing that magic.
1. Preparation is Everything (The Day Before)
Twilight waits for no one! Since you only have a 15-20 minute window for the perfect light, meticulous planning is essential.
- Check the Time: Use an online calculator to find the precise sunset time for your location and date. Aim to start shooting 10-20 minutes after sunset, during the “blue hour.”
- Scout the Property: Visit the property during the day to determine the best angles. Where will the home be best showcased against the dramatic sky? Plan your compositions in advance so you can move efficiently.
- Power Up: Charge all your batteries (camera, flash, drone) and clear your memory cards.
2. On-Site Setup (Before Twilight)
Get to the property at least 30-60 minutes before sunset to stage the scene.
- Light it Up: Turn on every single light, both inside and outside—ceiling lights, lamps, kitchen under-cabinet lights, landscape lighting, and pool lights. This is crucial for that inviting glow.
- Declutter & Stage: Ensure the exterior is pristine. Move trash bins, clean up driveways, remove any hoses or personal items, and close garage doors.
- Camera Placement: Set up your tripod and camera on your planned angle. A sturdy tripod is non-negotiable for the long exposure times you will use.
3. Your Essential Gear
You can’t do twilight without the right tools:
| Equipment | Why You Need It |
| Sturdy Tripod | Essential for long exposures to prevent camera shake. |
| DSLR or Mirrorless Camera | A camera with good low-light performance and manual controls. |
| Wide-Angle Lens | To capture the scale of the house and the dramatic sky (e.g., a 16-35mm). |
| Remote Shutter Release (or use the camera’s timer) | To fire the shutter without touching the camera, further preventing shake. |
| Speedlight/Flash | Optional, but useful for “painting” light onto darker foreground elements like landscaping. |
4. Camera Settings for the Blue Hour
The key to a successful twilight shot is balancing the bright interior lights with the fading natural light. For efficiency and control in the quickly changing light, we will use Aperture Priority Mode combined with Automatic Exposure Bracketing (AEB). Always shoot in RAW file format for maximum editing flexibility.
| Setting | Recommendation | Why? |
| Shooting Mode | Aperture Priority (A or Av) | This allows you to lock in your desired depth of field (f/) while the camera automatically calculates the base shutter speed needed for a proper exposure as the light fades. |
| Aperture (f/) | f/8 to f/11 | Creates a wide depth of field, keeping both the house and the sky sharp. This setting is fixed and controls your final image sharpness. |
| ISO | 100 to 200 | Keeps image noise to an absolute minimum. |
| White Balance | Cloudy or Shade | These settings help balance the warm (yellow/orange) interior lights against the cool (blue) sky, giving you a good starting point and richer colors. |
| Focus | Manual Focus | Ensure the house is tack-sharp before the light fades. |
The Essential Technique: Automatic Exposure Bracketing (AEB)
Because the dynamic range (the difference between the brightest and darkest areas) is still high during twilight, relying on a single exposure will result in blown-out skies or muddy shadows. You must use Automatic Exposure Bracketing (AEB).
- Set Your Bracket: Set your camera to take 3 or 5 bracketed shots with an exposure interval of ±1 or ±2 stops.
- Set the timer to 2 seconds. This way you will reduce any shakes.
- Fire the Burst: When you press the shutter button (ideally with a remote release), the camera will quickly capture a series of images at the same aperture (f/ value) but with different shutter speeds:
- One shot will be Underexposed (to perfectly capture the detail and color in the bright sky).
- One shot will be the Base Exposure (as calculated by the camera in Aperture Priority).
- One or more shots will be Overexposed (to bring out details in the shadows and the foreground).
These bracketed shots will be merged later in post-processing to create one perfectly balanced High Dynamic Range (HDR) image, combining the rich, detailed sky with the warm, glowing interiors. This is the fastest, most effective way to shoot twilight.
5. Post-Processing: Making the Image Pop
The final step is where the magic comes alive.
- Merge & Blend: Use software like Adobe Lightroom, Photoshop, or Affinity to merge your bracketed exposures into a single HDR image, balancing the interior glow and the blue sky.
- Color Correction: Adjust the White Balance. You want the interior lights to have a warm, inviting (slightly orange) tone, and the sky to be a rich, deep blue.
- Enhance the Sky: Deepen the blue and add contrast to make the clouds and sunset colors stand out without looking fake.
- Sharpen and Refine: Straighten any converging vertical lines, remove small distractions (like power lines or small reflections), and apply final sharpening.
Twilight photography is an art that requires patience and practice. By planning ahead, using a tripod, and taking advantage of bracketing, you can consistently deliver those breathtaking, high-impact real estate shots that sell homes.